Wednesday, December 22, 2010

Closer to Master Retreat

After the tile was installed in the master bath and the shower fully functional, the project picked up pace. We were also able to finish painting the bedroom and install the doors to the bath. We couldn't be happier with the final master suite. It is a soothing place to be and helped us weather the future kitchen renovation that actually got started before we completely finished the master suite.

As I've shared before, I don't always get it right the first time in some of our selections. Renovationism doesn't cause bad decisions, but sometimes I think I'm attracted to a trend and not true to my taste. Such was the case with the color of the master bedroom. Look at this photo and see the swatches of color I was considering:

Original color of room is a light gray/blue. Bottom left hand swatch is what I decided on.
Alan had his usual job of sanding the walls. As I've mentioned before, every paint job in this house was sloppy. Globs of paint and drips were everywhere. Alan had the tough task of sanding those down, which often uncovered bad patches, which just meant more prep work. Finally, it was ready for me to paint in that color I selected.

Alan hard at work with strong cross light to see the wall texture.

I wanted the room to be bright, but after I painted it that light blue/green, it looked like a nursery to me. Hated it. Paint is easy to fix, but time consuming nonetheless. After more searching through rooms on Rate My Space on HGTV.com, I found a color that turned out to be too blue for me, but it led me to Benjamin Moore Affinity Collection colors. I found Grasshopper and a darker green for the bath, Thicket. Here I am painting the room for the second time:

Repainting a room is pretty easy, but sometimes it does require a little re-cutting in on the trim work to avoid exposing any of the old color. When I paint a room for the first time, I over paint the trim work to ensure a perfect line. Didn't want to repeat all of that work on the re-paint.

I have my favorite brush and always cut in by hand, no tape. Tape is only used to protect other non-painted surfaces that paint must be cut in against and usually only if the angle is awkward or the reach is difficult.

We really love the new color. You can see that it goes well with the color of our furniture in the bedroom. The bath is not yet painted, you can see the primer on the walls through the opening. We also didn't have the doors to the bath in yet.

We moved the furniture while we were painting the room. Bed worked better on the opposite wall from the entry door, which is where it is in this photo. It was a little uncomfortable to sleep in this room while we were painting. There was still a lot of dust from the sanding and we had to crawl over furniture to get to the bed.

Dressers will go along the wall to the left, in between the entry door and the door to the cat room.
After this painting was complete, the tile work in the bath was also complete and we could install the cabinets. We selected Kraftmaid cabinets from Lowe's. Door style was Maplewood Square and the color is Canvas, which matched our trim color nearly perfectly. I did learn that big box stores have their own names for door styles. And they don't match the standard names the manufacturer's reps or their website uses. Tricky. You can see the Thicket paint color on the walls in the bath in the photos below, which worked really well with the neutral palette of stone and glass. Our toilet and sink were contemporary style American Standard in Linen finish. Countertops were Ceasar Stone in Jerusalem Sand. We started using the shower as soon as it was done even though we didn't have any other plumbing in the room that worked. Loved the shower so much we didn't mind going into the hall bath to brush our teeth.


Alan's side. Undermount sink is in, but no fixtures. Turned out we had to buy extensions for the Delta faucets because the quartz is thicker than granite or laminate. That caused a delay in getting the sink functional.

Upper cabinets would be installed next. Needed to put countertop on lower cabinet first since a stack of small drawers would sit directly on top and that upper cabinet needed to line up exactly with the upper cabinet that was going in over the vanity.
We really liked the look of the rectangular sink. You'll also note we elected to go with 24" deep base cabinets, a kitchen depth, rather than the bath standard of 21". This gave us extra room behind the faucets for toothbrush holder, cup, etc. The size of the bath is small, so we didn't have the luxury of an expanse of counter space from side to side. So, the extra depth really expanded our work space at each sink.
I elected to install the backsplash around the sinks myself. Alan is masterful at cutting tile and we own a wet saw. We saved money on the labor and it wasn't that hard to do.

We repeated the pattern in the shower and finished the top edge with pencil.

New furniture arrangement works really well and the flow through the bedroom into the bath finally works.

We also added all new closet system with double stacked racks. It is amazing how much more you can fit in a closet when you organize the space well and use the right hardware. The translucent plastic you see on the right is the edge of my shoe cubbies. We originally bought these back in Memphis from Target, but I haven't seen them again. I really like how you put it together yourself so you can decide how many cubbies tall and wide you need.

My side of the bath almost complete. Still have a mirror to install in the space under the cabinet. The oval mirror over the sink is also a medicine cabinet. This one had to be moved twice to get it centered.
We have also frequently used eBuilderDirect.com to buy hardware and fixtures. We loved these over-sized brushed nickel handles. They really work well with the style of the cabinets.

Alan's side of the bath. His mirror is also a medicine cabinet. We put a little collection of accessories on wall-mounted shelves. The photos are hard to see in this picture, but they are of our trips to the tropical locations of Moorea in Tahiti and Cancun, Mexico. Seems appropriate for a spa bath.

Shower even looks good with all our crap in it. We are religious about using that squeegee. We got the Shower Guard glass, but you still need to be diligent about keeping soap scum from building up. I have to say the Shower Guard is working. Glass still looks perfect and I've only actually cleaned it with chemicals a few times. Rest was just squeegee.
This photo shows the doors from the inside.
We still have some details to complete in the bath and closet. We also finished accessorizing the bedroom. I'll post a final reveal soon. But, my next post is going to move on to the plan for kitchen. I think it is more accurate to order in this way because our projects overlapped. It will give a better sense of how we experienced the progress (or lack thereof in some cases).

Sunday, December 12, 2010

Progress on Master Bath

Even though we had the hall bath to use while the master bath was under construction, it does wear on you to live in a construction zone. The walls were in and that always feels like you should be farther along than you are. Work gets done, but it still feels like it is getting nowhere. It is actually kind of painful to relive this portion of the project. It all turned out well, but the process did feel slow.

I was able to get the walls and ceiling primed before the work on the radiant heat was started. One thing about being your own general contractor is that you can make that choice.

In addition to priming the ceiling, I wanted to get the finish paint on as well. I didn't want to figure out how to work in such small rooms and keep paint from splattering on tile and cabinets.

Yes, it is dark outside. I can only do this work at night or on weekends and invariably someone was coming to work on the room on a weekday and do the next step that would keep me from being able to get the paint done. So, it turned out to really just be nights that I had to work it in.
Finish coat on the ceiling.
We were really excited to put radiant heat in the floor. We had heard great things about it and it just sounded like such a fabulous feature. Also, this step was the next big hurdle before we could get tile done, which would be the first signs of our design work in this bathroom.

Plastic tubing was stapled over tar paper and wire mesh.

This is the bathroom side.

Hallway connecting bath and closet


Closet side.


Because this installation is on the second floor, a manifold was placed in the wall between the bathroom and the closet on the closet side. A metal cover will be put over this.

After the tubes were in place a bed of mud was put over them. Once that was dry, we had the crown moulding installed. We continued the same crown as in the rest of the house. We also elected to have a fiberglass shower base. It is more reliable to hold water than a traditional shower pan. Since this bathroom was on the second floor, and as we know right above the kitchen that we would renovate next, we didn't want to take any chances. We also had the shampoo boxes covered in fiberglass as well.

Fiberglass in shower, mud bed on floor, and the first of the tile.
After the shower walls were tiled, they started on the floor. We selected a pinwheel pattern with nine squares of shell mosaic as the pivot points.

Here is the finished tile on shower and floors.


Tile pattern carried through to the closet.

Shampoo boxes have a little sparkle from the mosaic. Strips of brick shaped mosaic with pencil above and below were strategically placed.

Final shower with frameless glass door and fixtures.
We began using the shower right away. The toilet is just sitting in place and you can see only part of the room is painted. I did that just to get paint behind the toilet because there was no way I could paint behind it once it was in place.

We still didn't have cabinets or sinks, but it was a great start. That radiant heat is the best thing ever! Just love it. And the weather was turning cold, so just in time.

While we were doing this project, we finished the master bedroom. We needed the doors to the bathroom installed before we could do much more, but we did paint the room, rearrange all the furniture, and add lighting. I'll share some of that work next time.

And, where I left this last time was that new door to the cat room. It wasn't completely finished yet, but it was installed and operational.

Bedroom side.
Cat room side. Door ended up in the perfect place on both sides. Must have been meant to be.

Tuesday, November 23, 2010

Demolition Day

A big project like the master bath requires major demolition. Not only did all the fixtures, flooring, wallboard, and part of a wall need to come out, but our kitchen ceiling below ultimately needed to be completely removed to expose all of the plumbing that needed to be rerouted to accomplish the proper placement of the new plumbing in the master bath.

Another big obstacle was the soffit in the kitchen. We did not want it and our kitchen remodel would call to remove it. So, given that it was completely filled with plumbing and electrical it needed to be removed before we could continue with the master bath project.

Here is what it looked like:

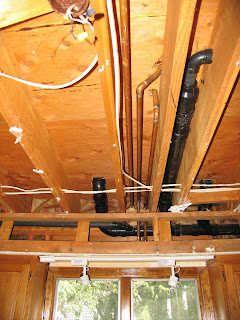
I'm not sure they could have fit more plumbing or electrical into that soffit.
Soffit ran all the way into the eat-in area of the kitchen over the sliding glass doors. Ugh.

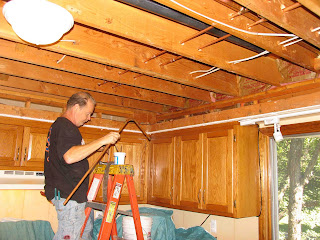
Steven is rerouting plumbing. He had already moved most of what was in the soffit and had torn much of the framing of the soffit out. We still had more demolition to go, but that could wait until we started the kitchen.
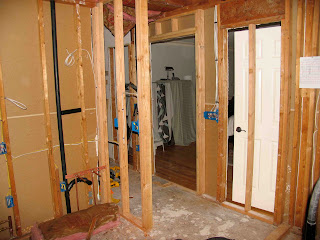
The bathroom was completely torn out as well by this time:

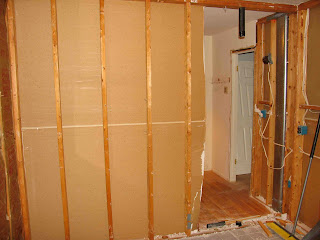
Wall separating the closet from the bathroom was cut back to create opening which would later turn into a hallway. That metal air duct in the wall on the left side of the photo had to be moved. That was where our new door was going.

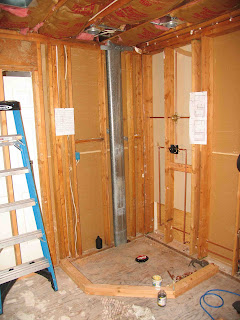
This was the rough-in on the shower and some plumbing work was already in place. 
That air duct you see in the above photo could not be moved. We didn't really notice it was completely in the way of our original shampoo box plan. The drywall installers were coming in the morning, so this resulted in a late night design session to rework the placement of all the shampoo boxes and the hand-held shower as well. Glad we noticed the problem in time to fix it.


New doorway is framed in and rough-in electrical is in place. The T-wall is also framed in. To the left of it is where my vanity and sink will go.

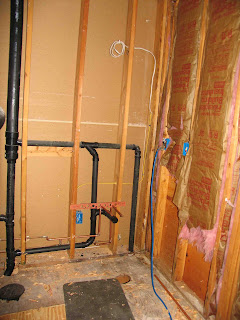
Rough-in plumbing is also in place. This is where Alan's vanity and sink will go.

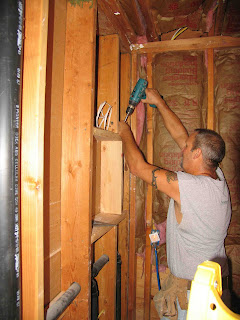
One of our ideas was to install recessed medicine cabinets over each sink. This did turn out to be a great idea. But, one of our lessons learned was not to frame them in advance as you see being done here. You just cannot judge center at this stage. Trust me.
The plumbing took a long time to complete. So much rerouting was necessary both because we moved and upgraded every fixture in the bathroom and we wanted to remove that soffit in the kitchen to clear the way for that renovation. Our plumber was also limited to evenings and weekends due to his full time plumbing job. Our carpenter, also our neighbor, was likewise limited in schedule, but there was much less carpentry work needed. Finally, we did get to the drywall stage.
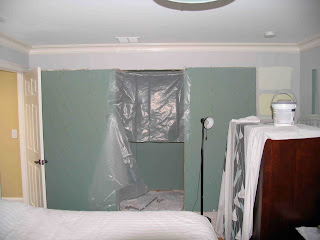
We elected to use green board due to its moisture resistance. While unnecessary, we just continued it on the bedroom side of the wall.

The shower was framed out in cement board.

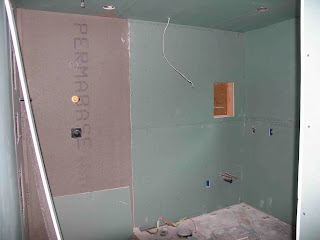
This is the side where my vanity and sink would go.

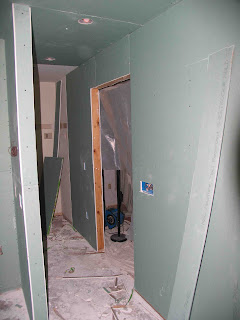
The new entry and hallway was shaping up well.

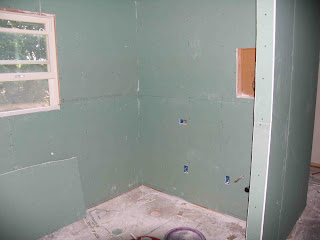
The window was one of the few elements to remain where it was.
While all the plumbing was being done, use of our bedroom was impacted. We normally let our four cats into the room with us at night, but we had to curtail that because the bathroom was all open, including some of the floor for a time. I could just see one of those cats getting electrocuted, falling in between the wall studs, or even jumping down into the kitchen from one of those holes in the floor. Yikes.

This situation got Alan to thinking that their room is right next to ours and we could put in a door so that we could remove all the kitty litter boxes, food, and water out of our room completely. I was resistant at first. It would cost money, tear up the other side of the bedroom, and would it really fit and look right in the other room? After a little testing of the spacing, I warmed to the idea. It turned out to be brilliant. It did tear things up for a while, but it is perfect.

The demolition process began on the new door to the cat room.
We still had the radiant heat to go in the bathroom and closet floors and then all the tile work for the shower and floor. The cabinets that we ordered at the beginning of the project were delivered and in the garage, so they were ready to do also. Stay tuned.

Thursday, November 11, 2010

Big Plans

I promised to post about the living room, but the photos weren't quite right and now I can't get into that room for a while because of the work we are doing on the first floor. Instead I will share the plan for the master bathroom, one of the two big renovation projects that we queued up after we made some initial progress on the smaller projects--and got rid of all that pink paint.

Take a look at what we started with in the master bath, a disaster:

Only one sink and small vanity cabinet. The seated vanity is nice, but it is too high and there is no room to fit a stool in the room anyway.
All fixtures were gray and there was flowered wallpaper everywhere. This tub took up all the space in the room. And, the toilet was wedged in the corner. 
Shower was small and dark.

This is the master bedroom before we moved in. The bathroom door is behind the open door to the bedroom on the left. This configuration just didn't work. These doors were always in the way of each other. The other door goes to the walk-in closet.
Walk-in closet was decent size, but not configured to hold much.
I really couldn't wait to get rid of the wallpaper in the bathroom, so we removed it when we removed all the other wallpaper. The wallpaper removal revealed some ugly surprises:
Apparently that tight space for the toilet didn't work for the previous owners. It got wet--often--and we found all this mold under the wallpaper.

We also found mold under the wallpaper by the shower door.
Once we determined that we did not have any current water leakage we began planning for this space while we worked on public rooms downstairs. We would ultimately have to use this bathroom as is for 7 months before we were ready to start demolition.

Here is the plan we developed:

This plan includes placement of all plumbing fixtures, lighting, and cabinetry. Circles with crosshairs indicate ceiling lights; circles with double lines indicate outlets, S indicates switches.
Our plan addresses all the problems with the space. We eliminated the doors to the bathroom and closet and replaced them with a double door on the center of the bedroom wall. We removed part of the wall that separated the closet and the bathroom and put in a T wall that would create a hallway instead.

We also chose a larger shower and no tub so that we could get two separate sink vanities, a seated vanity, and tall cabinets, significantly improving the working space and storage space.

Another concession we made was to have the toilet out in the room. There was not enough square footage in the space to allow for a reasonably sized room for the toilet while meeting all of our other more important objectives.

This floorplan did require that we replace the perfectly good hardwood floor in the closet since the floor needed to continue seamlessly from one room into the other.

We also decided on water-based radiant heat in the entire space. You can't install radiant heat unless you remove existing flooring, so now would be the perfect time. Also, this allowed us to remove the baseboard heat units in the bathroom and closet, which gave us more room for cabinetry. This heating method keeps the otherwise very cold tile warm under foot. It is also a very efficient heating method, particularly in colder climates. It made the floor higher than the hardwood in the bedroom, but it is less than 1" and with the threshold at the doorway it feels perfectly natural. The fabulous heat is well worth it!

Our plan was also to create a spa feel in the space. So we chose travertine tile with glass and shell mosaics to create a neutral palette. We also chose brushed nickel fixtures. The only color in the room would be paint color, towels, and accessories.

Come back and see how this project unfolds.