Friday, December 30, 2011

Final(ly) Kitchen Reveal

The kitchen took a really long time to complete. Way longer than the last kitchen we did and way longer than we expected. It really takes the fun out of it. Between the issues with the contractor, having to figure out some of the solutions ourselves, and then, of course, the flood, it was a difficult and stressful project. But, it all turned out great. It was a major transformation and it is good to look back at where we started. Remember these photos on the left from an earlier post? Now, on the right is where we ended up.

Before
After

Before
After

Before
After

Before
After

Before
After

Before
After


Before
After


Here are a few more shots of the finished kitchen:


Mixer stand is really convenient.


Still need to reupholster the chairs. Going to do a rust color. The chairs were cheap, so the reupholstery will cost more than the chairs, table, and bar stools put together. But, I never intended to leave the drab taupe microfiber on these chairs when I bought them. Sure wish I knew how to reupholster furniture. That would be a big savings.

Really enjoying the beverage center.

Glad we ended up doing the table and chairs instead of either an office desk or banquette. Provides maximum seating, traffic flow, and flexibility.
Once we finally finished the kitchen, we took a little time off. But, then we had the two guest bedrooms to do. While they did not require the construction, they did require a lot of work on our part and then the decorating. We are down to some details in those rooms, so I'll post those next.

The saga continues . . .

Sunday, November 13, 2011

Levitation

One of our favorite features in the kitchen we renovated at our old house was the floating glass bar. I saw a photo of something similar, but more modern, in a magazine and thought it would work well in our large island design to break up the large expanse of granite. We had to engineer this ourselves and had iron brackets made along with the custom glass. Here is what that looked like:


In our new kitchen we had a peninsula in the design and it made sense to have a bar there. We liked the floating glass top design so much that we decided to repeat it in the new kitchen. Our contractor, however, couldn't figure out how to do it, which turned out to be a blessing in disguise given their lack of getting things right. So, we had the engineering know-how, having done this before, but in a new area we did not know the resources for the iron and glass work.

We used the Internet to research iron work. Turns out no one in our county does this type of work--hence the complete lack of iron fencing. We wondered why no one did that, figured it was the expense, but no, it was just lack of resources. Our search took us across the river to Westchester county and it turned out that we found a great company that does terrific work and really cares about the quality of the job, Mohegan Metalworks. Here is a look at the custom-fabricated iron posts in the new kitchen:

We knew the design we wanted since we had engineered this bracket before in our old house. No need reinventing the wheel when you have one that works.

This particular bar is a bit longer than the bar was in our old house, so it needed three brackets instead of just two. Also note the cabinet door to the right of the far right bracket. We put our grill tools in there and it works great. Looks like when the glass goes on top it might be hard to get into, but no.
These brackets are trickier to install than it might appear and they had to come back three times before the final installation was perfect, but the beauty of that was that Mohegan insisted on perfection on their own. Normally I'm the one insisting on getting it right, so I was thrilled that our vendor was taking this view proactively without any urging on my part.

Now we need to find glass. While we were picking our our tile in Artistic Tile, our consultant recommended Galaxy Glass in New Jersey. So, we went there to look at options and get samples. They had some beautiful options. One we could not get a sample of, but it was molten glass, where they build a form and pour molten glass in it, like you would concrete. The glass gets bubbles in it and looks like a big block of ice when done. But, the minimum depth on that option was 2", which makes for a really thick countertop. Consider most glass countertops are 3/4" thick. We asked for an estimate anyway, but knew that would be too overwhelming in the space.

Other options looked good and we thought one of these would work well, depending on the price.

This was simple frosted glass.
This one we loved! It has copper screen sandwiched in between two pieces of clear glass. Cool! Next to it is smoked crackle glass, but we thought that one was too dark.
Then, we got the estimates. Holy cow! Molten glass was $10,000, so good thing we knew we didn't really want that one. Other two pieces were each about $5,000. So much for the cool copper screen. No way we are even considering paying $5,000 for a piece of glass that is only about 4' long.

So, we went to the place we got our shower doors done to see if they had anything interesting. Everyone makes the simple frosted, so we found that, but they did have others.

This one had a pebble effect and it could have worked.
Prices were still high, but half of what Galaxy was quoting. Still, more than we wanted to spend and more that we did spend when we did our old house only a little over 3 years earlier. So, that gave us an idea. What if we went back to the place we got our glass in Memphis? What we needed was simple and we could provide all the measurements. It could be shipped here. Only drawback is that we'd have to install ourselves.

So, we called Glassical. They couldn't provide the copper screened version, but they could do the frosted glass and could have done any of the other pebble or cracked glass versions. And, unbelievable, even shipped their price was half of the last vendor, so 25% of the original Galaxy quotes.

We opted for the frosted glass under the principle of less is more. There was enough going on in the kitchen already and simple felt right. Since this was long distance, we did have to provide a detailed scale drawing and accurately mark the locations for the stainless steel mounting discs underneath. While it is possible to just put felt or rubber spacers on the brackets, we wanted it to be secure and that requires screws. So, we were a little nervous and measured and remeasured about a dozen times before we finalized the drawing and hit the send button on the email.

Here is how it turned out:

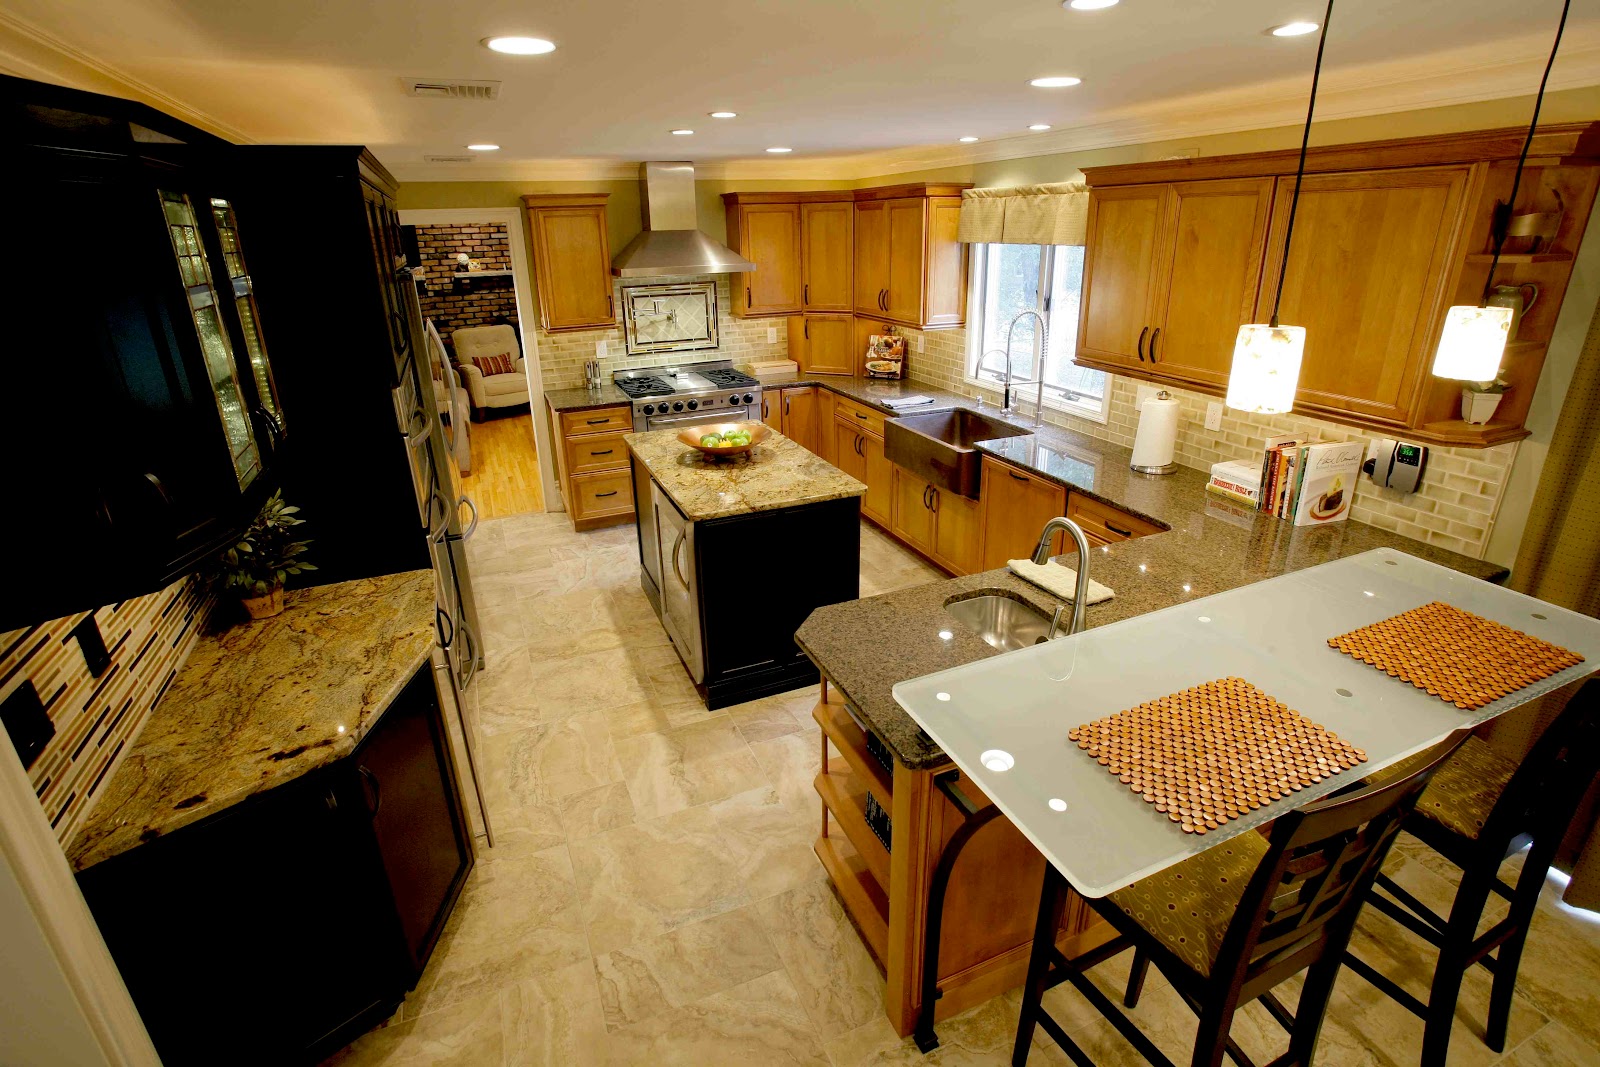
As we learned at our last house, no more than two people will ever sit at a bar, so we designed it to fit two stools. We also got two cool pendant lights that are over the bar that line up with the two can lights that are over the prep sink area.

This is the view I have when I'm prepping food. Guest can sit at the bar with drinks and snacks and we can chat.

Here you can see how the bar floats above the counter top.
So, that was the last element in the kitchen. Next post will be the final reveal!

Monday, October 10, 2011

The Great Flood

Mother Nature has nothing on a plumber that does not know how to install a Dornbracht faucet.

As we were about halfway through the kitchen project, Alan took me to lunch one day. When he arrived home, he found the house flooded. The hot water connection on the kitchen sink faucet, the Dornbracht Tara Classic that we loved, had blown off and hot water was spraying the inside of the under sink cabinet for a few hours. Well, it was hot until the water in the basement got high enough to shut off the water heater.

I'll never forget when he called me to tell me. I never heard such terror in his voice before. I instantly thought that he had come home to find all of our cats dead or that one of our grandchildren was critically injured or killed. Once I realized we were talking material damage, it wasn't so bad.

But, it was a mess. Alan acted quickly and got the water shut off and called the plumber to cap the line so we could have water to the rest of the house. Then, moved everything out of the flooded areas into other rooms to save what wasn't already ruined. Sometimes it is a benefit to not have completely level floors. The water moved into the family room, avoiding the rooms we had already completely renovated and decorated. Then, with hardwood floors, the water seeps in between the planks and then it flooded the basement--another area we had not yet begun to renovate.

Most of the damage was to the building materials. Drywall in the stairwell going into the basement, all the insulation in the ceiling of the basement, and several cabinet doors and all the kick trim under the cabinets.

Our insurance company called ServiceMaster to do the water damage control and clean up. The did a great job and saved our floors. I was just sure the hardwood would buckle and we've have to replace it, but we didn't. The downside to the water damage control is the noise. We had 5-6 industrial blowers and suction units in the kitchen and family room for five days. Imagine you are in the back of a jet for 5 days straight. We had to just use the downstairs to get in and out of the house and spent any time we had to be in the house upstairs, where at least it was just a dull roar. So, our new kitchen was rendered virtually useless again. The gas burners on the range would not stay on unless the fans were off and we needed those on to dry everything out. More meals at the diner down the street.

So, you might be wondering where the pictures are. The whole ordeal was just too painful to photograph. The contractor never took any responsibility for the faulty plumbing job, in fact blamed us for picking out this weird faucet that probably wasn't made right. The lesson I learned from this was never have any contractor or subcontractor do any work they cannot prove they have done before. I challenge anyone to pick up a magazine on interior design or kitchen design and not find a Dornbracht faucet in the photos. I reached out to one of our customers at work who builds really high end homes. I knew his plumber had to have put in dozens of Dornbrachts, and sure enough, that was true. Hired the experienced plumber and we haven't had a problem since.

Here is the photo of the faucet before it was installed.

The center faucet is in place. This is the pre-rinse faucet.
It took a really long time to fix all of the damage. We had to order new kicks and several cabinet doors, which take weeks to arrive. While we were waiting, the doors that were the most soaked had the time to really dry out. The one that took the most water cracked in half once it completely dried.

Here is the finished faucet, installed correctly.


Next post I'll feature the glass bar top. That is another project that we had to do ourselves. And, we were quite surprised at how we ultimately sourced out the glass.

Look for the next post soon.

Saturday, August 27, 2011

The Fun Part

My husband and I both really love the design decision part of renovation. Once we selected the tiles we loved for the backsplash, we had to create the detailed design so that we could measure how much to order. When ordering custom-made tiles, you really can't make a mistake and come up short. You want a little left over at the end, but not too much. At the cost of these tiles, you can't afford to pay for a lot of tile you can never use.

So, we got started. With color palette and tile dimensions at hand, we began to put drawings together so we could see our designs. It still takes a little imagination, but this process of drawing out our designs has really helped us agree and make good decisions. It is an advantage that we have. Alan has become quite skilled at Illustrator and he prefers this software over all the other options. I used to be able to operate Illustrator, but it has been a long time. So, here is another good example of where our skill sets work together well.

Here is the chronology of our designs:

The bar area is where we knew we wanted the sticks. The other areas were more up in the air to us in terms of design. We never considered all sticks because it is too much of a good thing and as the cabinets were different in the other parts of the room, the backsplash really needed to support that.
At first, we did not attribute accurate colors, but focused on tile size. This design featured 4 x 4 tiles at the bottom and subway on the top with dark raised pencil separating the two all the way around the bottom. Then, we thought small squares in the same randomly distributed color palette as the sticks would surround the pot-filler, demonstrated here by a simple dot, framed by the same dark raised pencil.
We also considered making a frame with the pencils and the small squares instead of filling the field completely around the pot-filler. Then, in the center, we put more 4 x 4s on a diagonal.

It appeared that a thinner frame of the little squares would be better balanced.
At this point, we moved forward with an estimate. As is always the case, that is an enlightening activity. We knew this tile would be expensive and we had some per square foot pricing on the sticks and the subway tiles, but when we got the estimate we were astounded by how much of the cost was driven by the dark, raised pencil borders. Yikes. Just those were $1,000. We were able to do these cool tiles because we basically traded the installation cost toward the tile purchase and would install ourselves. As I've mentioned before I'm the only person I know that will work for me for free, well, except for Alan.

So, we didn't think all that pencil border was worth the cost, so back to the drawing board, literally.

We considered just removing the pencil border at the top of the 4 x 4s.
Then, we thought maybe if those 4 x 4s were in the dark color instead.
Then, we looked at using the sticks instead of the little squares and how could those be used for a border.

We were liking the sticks framing the pot-filler and tried that with the dark tiles at the bottom.

Then we thought maybe the stick border could be placed differently.
Then, we wondered what it would look like if the bar side had the dark 4 x 4 border at the bottom.
We ultimately decided that the dark 4 x 4 square border at the bottom would look too much the look you'd get from laminate countertops since our counter top was the Tropical Brown granite. That would defeat the purpose of doing the better materials. We also thought repeating the sticks over the range would bring continuity to the design. We also determined that the subway tiles could just fill the whole field and that no additional border really improved the design.

Then, it is subtle, but if you look at this last design and scroll up to an earlier version you will also notice that we determined we had to move the location of the pot-filler. It was too high. This involved some additional plumbing work, but it wasn't that much and Alan could do himself. Absolutely worth it. When you have an eye for design, those little issues of scale, proportion, and things lining up like they should will drive you nuts if you don't take the time and spend the money to do it right. I always consider the cost of those adjustments in terms of percentage rather than raw dollars. If you need to spend less than 5% of the total cost of the item, in this case the entire tile backsplash, then why wouldn't you make it right?

We ordered the tile, which now cost much less than the first estimate, and waited 12 weeks to get it. But, I won't make you wait that long. Here is how the installation went:

Stick tiles were very cool! Couldn't wait to install.

Raised pencil border tile was worth the splurge.

Subway tiles were also fabulous. Love the watercolor and crackle finish.

It took us three weekends to install this tile. We started with the sticks and the framed area around the pot-filler.
Sticks turned out great! This is before grouting.

Looking at it from a little further back to see the entire bar area.

We were also very pleased with this design around the pot-filler.

You can see that the pot-filler is now in the perfect position.
Grouted and subway tiles all installed.

Left of the sink subway tiles.

Installing tiles to the right of the sink. The subway tiles were all individual and had to be placed one at a time.
A tip: Wrap the electrical outlets in electrician's tape to cover where the wires are attached. With wet slippery fingers trying to put tiles as close to the box as possible, it is an electrocution waiting to happen. I got zapped once before we did this. Should have done it first.
Finished and grouted to the right of the sink.

So, the tile backsplash was done and we loved it. Next post I'll talk about the great flood and the process of designing and selecting the glass for the glass bar on the peninsula. You will have to wait for the final reveal on the kitchen. But, not for long as we are nearing completion!